Why Python?
Python is a free, open-source, and super versatile programming language. Python can be used for nearly any programming project imaginable—from web development, to database management, to data science.
Developed in the late 1980s, Python has exploded in popularity in recent years, particularly in the data science profession. For that reason, it’s essential that you hone your Python skills for your future career.
In this program, you will be programming in Python 3. This is the latest version of the language and the one you’d be most likely to use on the job. However, Python 2 is still used, and it’s not always compatible with Python 3! You don’t need to understand all the details of this incompatibility right now. But you should know this: if you’re ever executing code that you found online and it’s not working properly, the problem could be that the code was written for Python 2. Before troubleshooting anything else, check whether the code was written for Python 2 or Python 3.
The Python Standard Library functions
A feature of modern programming languages is a library of standard functions built-in. This allows users to work with a set of standard, well-tested and optimised functions for performing common tasks rather than writing our own. The use of libraries results in more efficient programs written in less time.
Python has a substantial standard library where a slue of pre-built functions are available for use upon installation. An example of a function provided in the standard library is type() this function returns the data type of the input object to the user. Functions with similar purposes are organized into Modules. For example the Standard Python Library contains the math module which contains the following types of mathematical functions and constants:
math.exp()math.log()math.sqrt()math.cosine()math.pi()
The list above is a tiny sampling of the functions available in the math module and there are many more modules as well in the standard Python library. It is good to familiarize yourself with the functions available, spend some time reviewing the documentation and using the base Python functions.
Other libraries - Modules and Packages
As we mentioned earlier because Python is Open-Source and has a large and ever-growing user base, there are thousands of libraries that have been developed and contributed to the community of Python users like you. These libraries are often developed around solving specialized problems and commonly referred to as packages or modules. When developing programs
if there is a no standard library module for a problem you are trying to solve, search online for a module before implementing your own. There is a wide range of Python libraries available for specialised problems.
Check out the Python Package Index (PyPI), a repository of software for Python. Search for different libraries — you’ll find software to help you with everything from sending emails to composing music.
Interactive python IPython
IPython is a library that provides a rich toolkit to help users work with Python interactively, similar to a scientfic programming environment like MATLAB. It is made of these components:
- A powerful interactive shell.
- A kernel for Jupyter.
- Support for interactive data visualization and use of GUI toolkits.
- Flexible, embeddable interpreters to load into your own projects.
- Easy to use, high performance tools for parallel computing.
Kernels
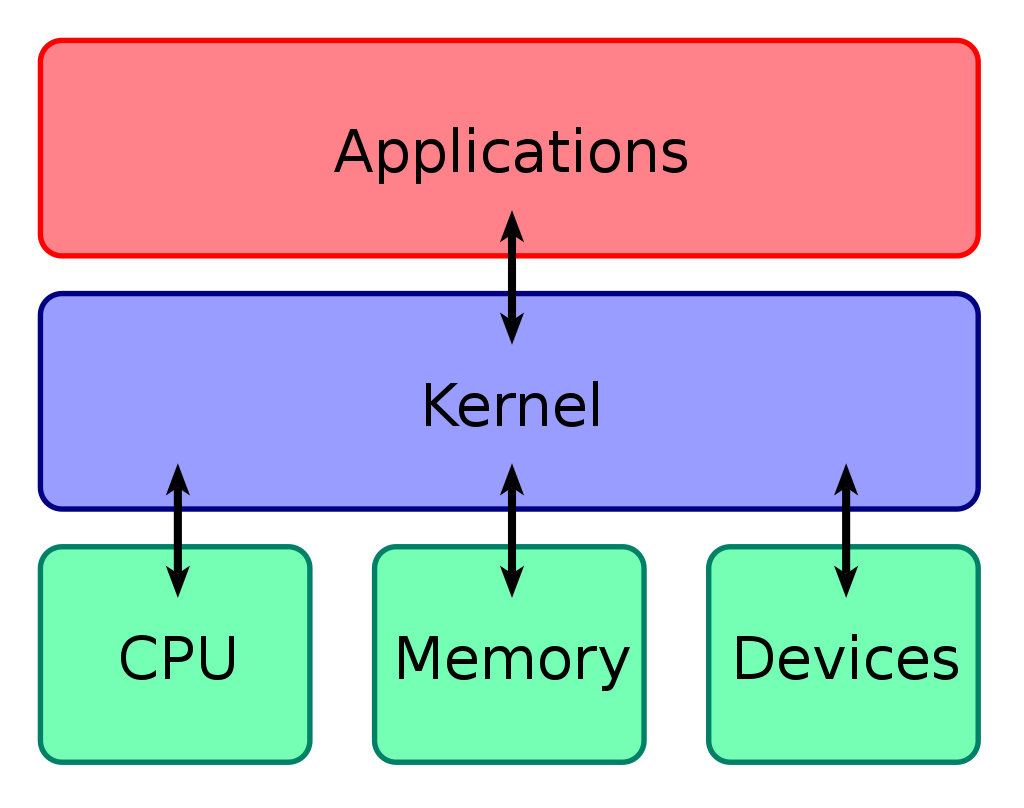
The kernel for Jupyter is what provides the interactive Python programming environment we use in this course Jupyter Notebooks. A kernel in computer science is the core of the operating system that allows communication between the user in software applications and the hardware components. In data science kernels have a front-end user side that allows for your programming to be written and pased to the back end host side through this connection. In addition to Jupyter Notebooks you will see the term for running kernels on Kaggle when you open a new notebook to view or compete in data science competitions.
Jupyter notebooks
Jupyter notebooks provide an interactive environment where you can mix text, equations, computer code and visual outputs. The flexibility of this tool has led to it becoming the standard in data analytics and data science for project development work. Check out the latest development of Jupyter notebboks, with more functionality Jupyter Labs works in the same way as Jupyter notebooks by creating a connection for user to run code and generate interactive results.
Troubleshooting notebooks
The most common problem you will encouter with Jupyter notebooks is a disconnect from the back end server, the fix is to reload the page. If your notebook does not return the expected results based on your code, double check your code and if you still don’t see the problem reload the kernel. Remember that all the code is dependent on the current kernel, therefore you must run all the previous cells in your notebook for the current one to run properly. Everytime you re-open your notebook you’re creating a new kernel connection and must run all the preceding cells to work on a later cell in your notebook. Think of it as a top to bottom operation where sequential cells are executed in order.
Magic Commands
There are some add-ons to Ipython known as Magic Comands that are meant to solve common problems faced by users of the kernel. Some examples include; running an external script %run myscript.py, timing a function %timeit, and plotting matplotlib figures inline %matplotlib inline for viewing. Learn more by reviewing the docs.
Working with Modules
Knowing what modules are and working with them can be two different things all together. So, let’s breakdown how you work with modules.
Check to see if the module you would like is installed. Note* These commands must be run in a terminal or caommand line window. In order to run them from within Jupyter notebooks place an exclamation mark in front of the command. pip list | grep <module_name_you_want_to_check> If you installed Python using Anaconda many common packages you will want to use such as Numpy will already be installed. You can get the entire list of modules installed in your current Python environment using pip list or in Jupyter !pip list
Installing modules
Let’s say you wanted to install the Geopandas module for working with spatial data in Python. There are three essential ways to install a package and the one you choose depends on your current Python management setup and preferrence.
- If you use the conda package manager
conda install geopoandas - If you prefer pip
pip install geopandas - Finally if you’d like to install directly from the source
pip install git+git://github.com/geopandas/geopandas.git
If you’re installing a module directly from Jupyter notebook using pip you would start a new cell and type !pip install geopandas.
Loading modules
Once you have the packages you need installed, you need to load them by running import commands. For example to load Pandas we type import pandas as pd and now anytime we want to call a function that’s available in the pandas module we preface it with pd. to indicate as such. Module import statements should be at the beginning of your program or jupyter notebook with one statement per line, such as:
import numpy as np
import pandas as pd
import scipy
from datetime import datetime
Those with from statements are absolute imports which only load the specified function from the module rather than all the functions in that module. These are recommended when you only need one or two functions from a module as they result in more understandable error messages and cleaner code.
Dependencies
Some packages will have dependencies, i.e. other modules they depend on in order to run properly. You can check the dependencies of a package using the pip show module_name command. When installing a package you may encouter a missing dependent module for the package you’re trying to install. Simply install the dependent modules first and then proceed with installing the module you would like to use. The package documentation will most likely list the core dependent and optional dependent packages see the GeoPandas page for an example.
If you encounter a module loading error it is likely a dependent package missing or if running code from someone else it might be a missing module all together. If you can’t discern what the error is indicating, search for the message on Stackoverflow. Most likely someone else has posted the same error and you will find community reponses to help.
Run a Random Forest Model
Download this notebook and save it in a place you can navigate to easily. Then start a Jupyter notebook from your Anaconda prompt or the Terminal and go to File --> Open and select the downloaded notebook.
Once it is open you’re ready to get started running Python in Jupyter notebooks.